Task
2.1: Creating the Classes
1. Start
protege and start a new Ontology.
2. Enter
an Ontology URI. We are using the following URI:
3. Save it
in the local file as university.owl.
4. Go to
the Classes tab.
5. The
empty class tree contains 1 class called Thing, which is superclass of
everything.
6. Create
class Person as subclass of Thing.
7. Create
Lecturer and Student as the subclasses of Person.
8. Create
class Module as subclass of Thing.
9. Create
CSModule and MathModule as the subclasses of Module
10. The
classes should look like Figure 1.0.
11. Make
all classes disjoint with each other.
Task
2.2 Creating the Object Properties
1. Switch
to the Object Properties tab.
2. Use
Add subProperty button to create a new object property (notice that all object
properties are subproperties of topObject Property)
3. Create
a new object property studies and select Student and Module as its domain and
range respectively.
4. Create
another new object property teaches and select Lecturer and Module as its
domain and range respectively.
5. The
object properties should look like Figure 2.0
Task
2.3 Adding Data Properties
1. Switch
to the Data Properties tab.
2. Use
add sub property button to create a new data property (all data properties are
subproperties of topDataProperty).
3. Create
a new data property first_name and select Person and string as its domain and
range respectively.
4. Create
a new data property last_name and select Person and string as its domain and
range respectively.
5. Create
another new data property staffID and select Lecturer and integer as its domain
and range respectively.
6. Create
another new data property studentID and select Student and integer as its
domain and range respectively.
7. The
data properties should like Figure 3.0.
Task
2.4 Adding some Individuals (Instances)
1. Switch
to the individuals tab.
2. Create
new individuals CS101 and CS103. Click on Types and choose CSModule for each of
them.
3. Create
new individuals M201 and M204. Click on Types and choose Math-Module for each
of them.
4. Create
new individuals Lecturer1, Lecturer2. Click on Types and choose Lecturer for
each of them.
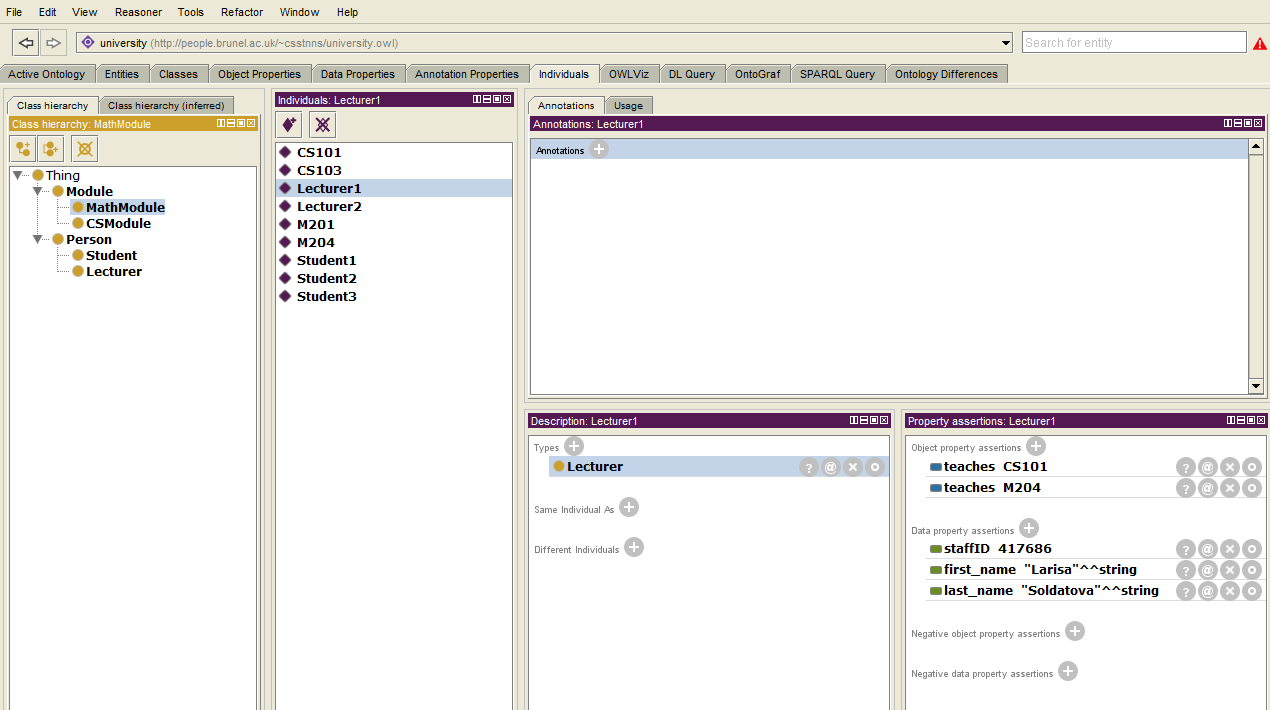
5. Click
on Lecturer1 and:
a. Add
Data property assertions: first_name of type string and Larisa.
b. Add
another Data property assertions: last_name of type string and value Soldatova.
c. Add
another Data property assertions: staffID of type integer and value 417686.
6. Click
on Lecturer2 and add Object property assertions: teaches CS103 and teaches
M201.
7. Add
Data properties for Lecturer2.
8. Create
new individuals Student1, Student2, and Student3. Click on Types and choose
Student for each of them.
9. Click
on Student1 and add Object property assertions: studies M204, studies M201 and
studies CS101.
10. Click
on Student1 and:
a. Add
Data property assertions: first_name of type string and value
b. Add
another Data property assertions: last_name of type strring and value
c. Add
another Data property assertions: studentID of type integer and value
11. Click
on Student2 and add Object property assertions: studies M204.
12. Click
on Student3 and add Object property assertions: studies M201 and studies CS103.
13. Add
Data properties for Student2 and Student3.
14. The
individuals should look like Figure 4.0.